Visualizzazione post con etichetta Timbroscrapmania. Mostra tutti i post

lunedì 7 novembre 2011

TIMBROSCRAPMANIA CHALLENGE #36


Buongiorno a tutti!!!
Eccomi di nuovo qui con una nuova card, questa volta per il challege di TIMBROSCRAPMANIA.
Per queste due settimane il tema sarà: MONOCROMATICO......... l'ho scelto io, spero vi piaccia!!
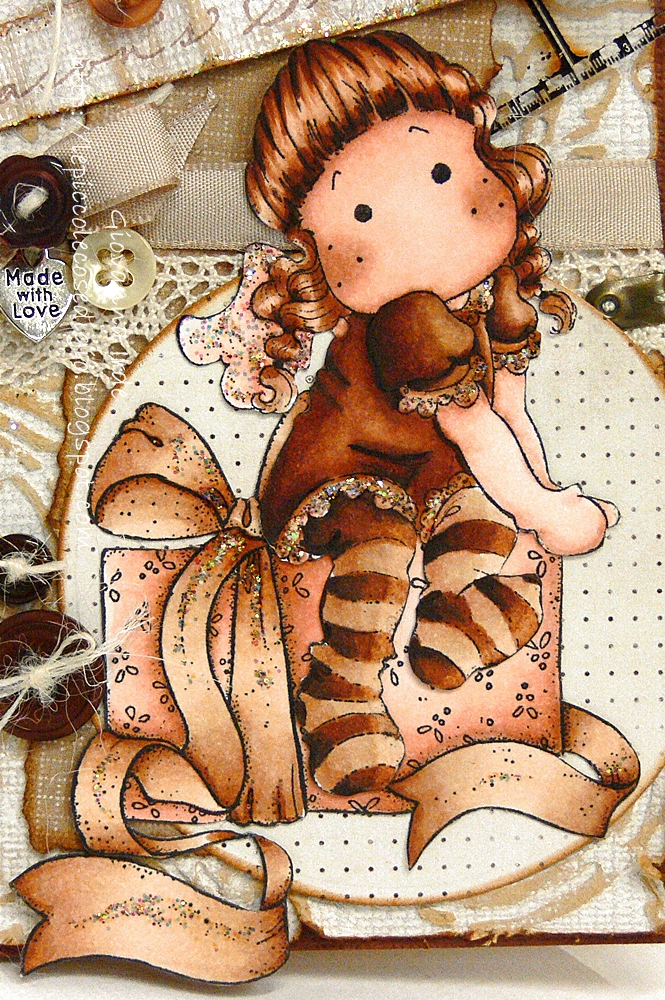
Quando devo lavorare in monocromatico le mie tinte prefertite sono tutte quelle della terra e anche se mi sembrava strano, quando ho finito di colorare questa tenera Tilda angelo il risultato mi è piaciuto molto.

Good morning to you all!!!
Here I am again with a new card, this time for TIMBROSCRAPMANIA challenge. For these two weeks the theme will be: MONOCHROMATIC....... I chose it, I hope you will like it!!
When I have to work in monochromatic my favourit colors are all earth tones and if it seemed strange, when I finished to color this angel Tilda I loved the result.


Sono colori che in genere non amo molto, per esempio nell'abbigliamento (dove sono molto più colorata), ma in questo caso credo di aver reso comunque la tenerezza dell'immagine. Il pacchetto infiocchettato sul quale è seduta la Tilda è uno dei nuovi Magnolia dell'ultima collezione. I cardstock ColorCore sono fantastici e in questo caso  ho utilizzato un ColorWash che ho embossato e poi grattato con sand block. Le altre carte che ho usato sono Basic Grey.

They are colors that in general I don't love, for example on the clothes (where I am really more colored), but in this case I think I had tendresse to the image. The packet with the ribbon on what the Tilda is sat down is one of Magnolia's lastest collection. ColorCore cardstock are fantastics and in this case I used a ColorWash that I embossed and then I scratched with sand block. The other papers I used are Basic Grey.

Copic used in this card:
Skin/Pelle E000 - E00 - E11 - 33
Hair/Capelli  E30 - E31 - E35 - E39 - E49
Dress/Vestiti: E31 - E33 - E35 - E37 - E39 - E49
Wings/Ali  E00 - E11
Box/Pacchetto E00 - E11 - E33 - E35
Ribbon/Nastro  E30 - E31 - E33 - E35

All'interno la bellissima die Tim Holz con la gabbia e l'uccellino e una bella sritta della Stampavie.
Sull'altra tag un altro delizioso timbro Magnolia dell'ultima collezione.

At the inside the beautiful Tim Holz die with the birdcage and the bird and a beutiful Stampavie sentiment.
On the other tag a delicious Magnolia stamp from the last collection.


Spero che il tema e il mio lavoro vi siano piaciuti e vi aspetto numerose al nostro bellissimo challenge.
Buona settimana, io sono sicura che la mia sarà splendida....... tra l'altro domani incontro con le amichette ^:^
non vedo l'ora......

I hope the theme and my work liked you and I wait for many of you for our beautiful challenge.
Happy week, I am sure mine will be wonderful....... tomorrow I will meet my friends ^:^
can't wait......

 Thanks for stopping by

Giò


mercoledì 5 ottobre 2011

Stampavie & More challenge and "Rubber Stamp Kissing Tenchnique" Tutorial


Buongiorno a tutti!!!! Quest'anno non sono molto contenta della fine dell'estate, probabilmente perchè non l'ho potuta goduta granchè LOL........ ma comunque credo che dovrò rassegnarmi all'arrivo dell'autunno.
Allora questa card da il benvenuto all'Autunno ed è anche la card che ho prepartato per il challenge Stampavie & More il cui tema è proprio l'Autunno.

Good Morning to all of you!!! This year I am not very happy to the end of the Summer, probably because this   year I didn't enjoy it a lot LOL......anyway I think I have to resign to the arrive of the Fall. So this card gives the welcome to the Fall and it is also the card I made for Stampavie & More challenge whom main theme is Fall.


I colori sono decisamente autunnali, ma non troppo spenti.
Per la scritta Fall ho usato un bellissimo set Stampin Up e la tecnica  Rubber Stamp Kissing Technique". E' una tecnica semplice ma sempre di grande effetto. Ed ecco come si fa!!!! Inchiostrate  il timbro prima nel tampone che darà il colore, in questo caso il Rusty Hinge e poi poggiatelo con fermezza sulla superfice del timbro che darà il disegno che avrete precedentemente inchiostrato con un colore di contrasto, in questo caso il Bianco.

The colors are autumnal but not too much dull.
For the sentiment Fall I used a wonderful Stampin Up set and Rubber Stamp Kissing Technique. It is a simple technique but with a great effect. And it is how you can do it!!!! Ink up the stamp before with the pad that have to give the color, in this case Rusty Hinge and then pose it firmly on the surface of the stamp that will give the drawn, you previously ink up with a contrast color, in this case White.


Questa è la foto di come risulta  il timbro dopo le due inchiostrate, si vedono chiaramente i disegni sull'inchiostro di base, non vi resta che stamparlo!!

This is the photo of how the stamp result after two inking, you can see clearly the drawn on the base ink, you only have to stamp it!!


In questo foto si nota bene come ho giocato con le penne Bianca e Nera per dare maggiore profondità alle lettere.
Trattandosi di una card autunnale, potevano mancare un paio di zucche??
Queste sono della Whiff of Joy e le ho colorate con i Distress Reinkers.

In this photo you can note how I played with White and Black pen to give more depth to the letters.
As it is a Fall card, how could the pumpkins miss??
These are Whiff of Joy and I colored them with Distress Reinkers.


....... E voi siete contente dell'arrivo dell'Autunno??? 
In un caso o nell'altro vi aspettiamo numerose a giocare con noi!!
                                                                 Felice giornata!!!!!!

..........And you, are you happy for the arriving of the Fall???
In a case or the other we wait for many of you to play with us!!
Have a nice day!!!!!!!

Thanks for stopping by

Giò


sabato 21 maggio 2011

Timbroscrapmania challenge!!!!!


Buongiorno a tutti e buon Sabato!!!!
Come state, spero bene!!! Oggi non vedevo l'ora di postare per farvi vedere questo lavoro!!!
L'ho realizzato per il challenge TIMBROSCRAPMANIA!!!! Il tema scelto da Lina è: RICETTE!!!
Che ne dite del mio portaricette calamitato??? Lo adoro!!!!!

Good morning to all and happy Saturday!!!!
How are you? I hope fine!! Today a can't wait the time to post to show you this work!!
I realize it for TIMBROSCRAPMANIA challenge!! The theme chose from Lina is: RECIPES!!!
What do you think about my magnetic recipe box??? I love it!!


Come potete vedere adoro anche il mio frigo!!! LOL
Per questo progetto ho creato un contenitore rettangolare usando un cartoncino pesante.
Ho rivestito la scatolina con la bellissima carta Maja Design tranne il retro.
Poi ho colorato con i Copic una dolcissima Tilda cuoca e l'ho seduta su un mattarello.
Sono proprio contenta di come ho colorato questa immagine.
Un nastro spigato gira intorno a questa scatolina fermandosi sul davanti con un nodo.
Sul nodo ho fissato un bottone al quale ho legato un delizioso ciondolo, poi lo spillo di Tim Holtz inserito proprio nel nodo del nastro regge la piccola tag che ho ritagliato dal timbro delle riceette.

As you can see I love my fridge too!!!! LOL
For this project I created a rectangular box using a thick cardstock.
I covered the box with the beautiful Maja Design papers except the back.
Then I colored my sweet chef Tilda sitting on a rolling pin, with Copic: I am very satisfy for this colouration.
A twill ribbon goes around the box and I add a large button on the knot. On the button I add a lovely charm.
Then I put into the ribbon's knot a Tim Holtz pin with a little tag that I cut from the large recipe stamp.


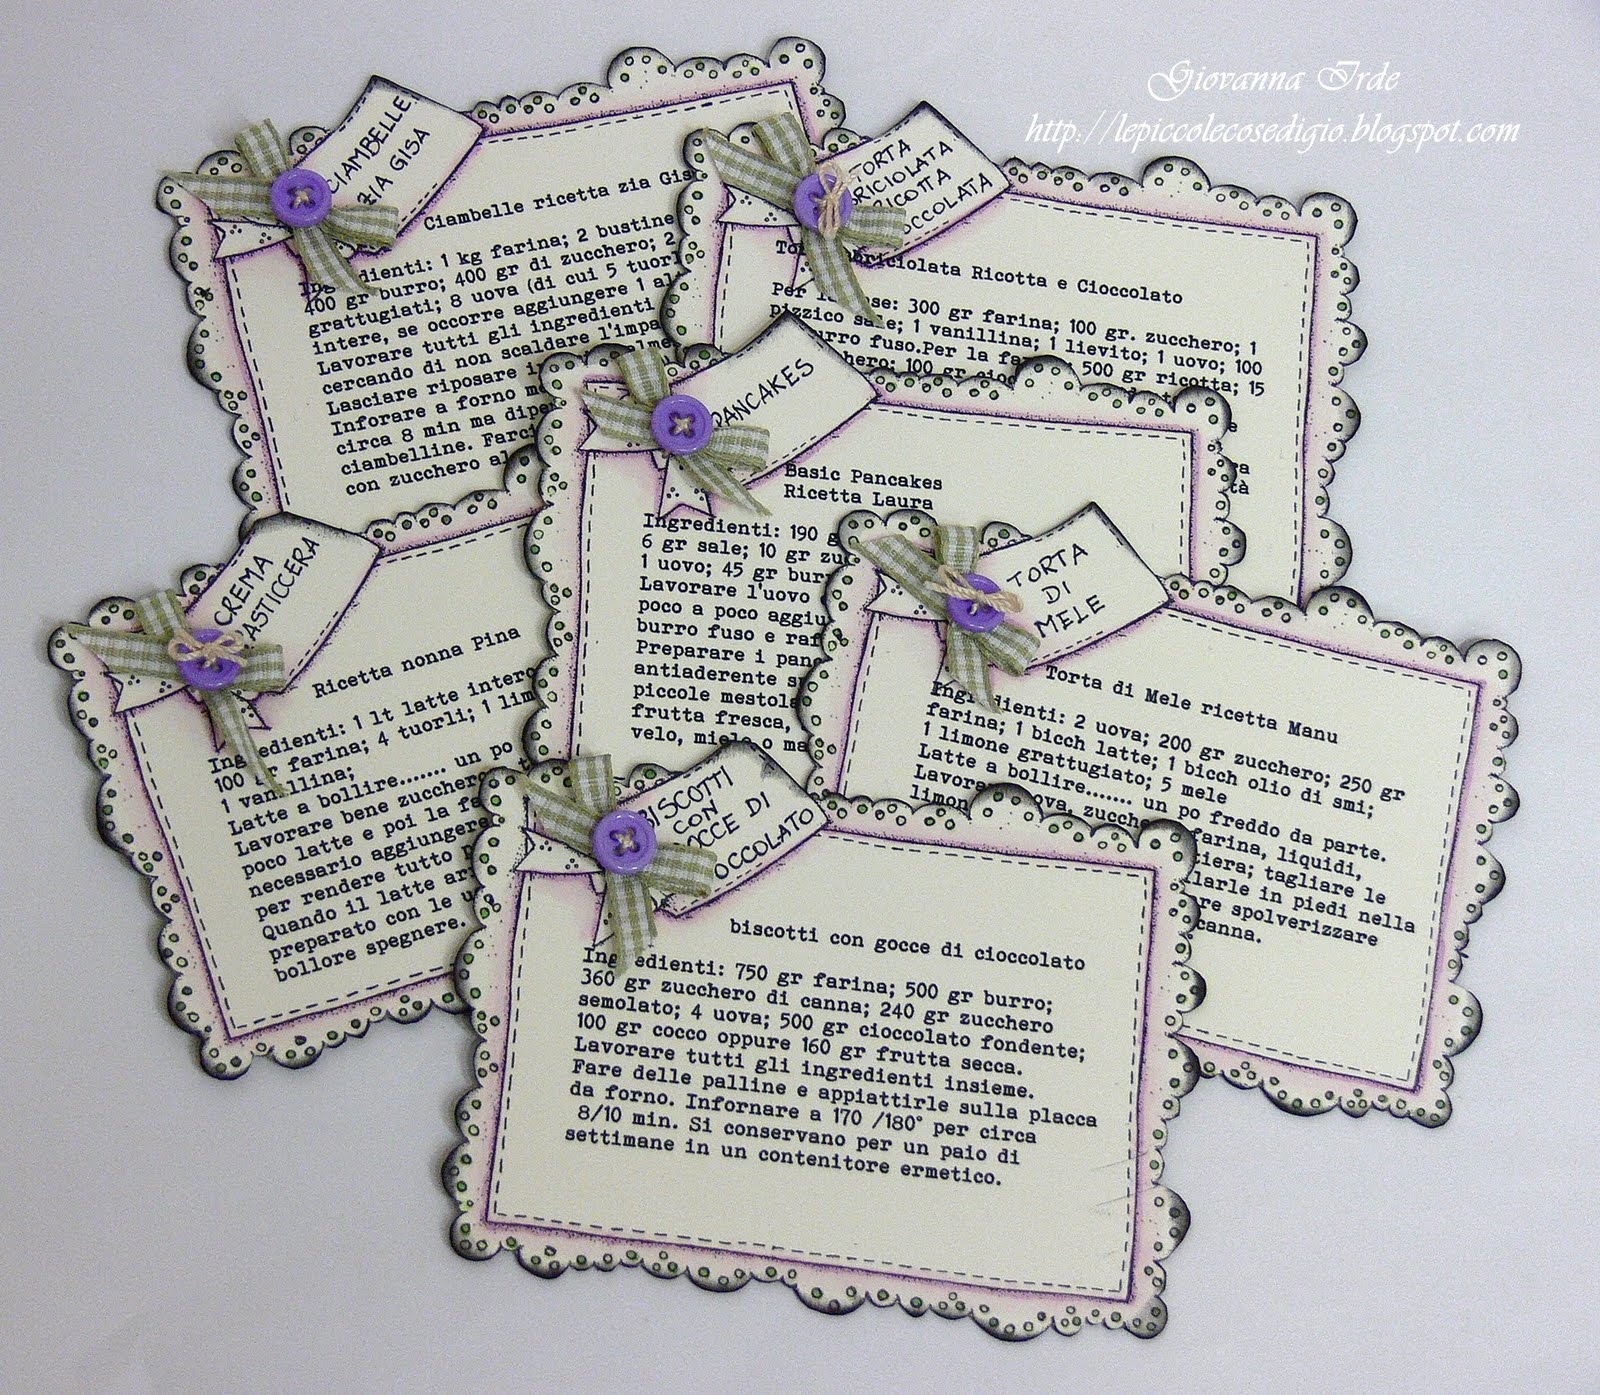
Per le ricette ho usato un bellissimo timbro Magnolia al quale ho tagliato la parte interna con le righe....... se tagliate con precisione non rovinate il timbro e le parti conicideranno per poterlo usare di nuovo completo. Per tagliare il rubber io mi trovo benissimo con le forbici di Tim Holtz, sono proprio uno di quegli attrezzi irrinunciabili. Anche le ricette hanno una leggera colorazione con i Copic e sono sfumate tutto intorno con il Black Soot Distress Pad.
Ho pensato di rendere magnetica anche la Tilda in modo tale da poter tenere ferma la singola ricette........ carina come idea vero?? Per fare questo ho usato una piccola calamita della Basic Grey. Una parte è incollata sotto la Tilda e l'altra parte è incollata sotto il mattarello.

For the recipes labels I used a beautiful Magnolia stamp, but first I cut the inside....... if you made a precision cut you don't cause damage to your stamp and the inside and the outside will fit so you can use it uncut again. To cut the rubber I use Tim Holtz scissor, a fabulous tool that I love.
Also the labels recipe are colored with Copic and distressed on each edge with Black Soot Distress Pad.
I thought that the Tilda could be magntic too so it can hold the single recipe........ cute as idea, isn't it?? To do it I used a little Basic Grey magnet. A part is stick below the Tilda, the other on the rolling pin.


Ho deciso di sfruttare anche il retro delle ricette, un po perchè non mi piaceva l'alone del colore lasciato dai Copic, un po perchè mi piace l'idea di creare uno spazio per le note legate a ogni ricetta.
Quindi dopo aver ultimato il fronte della ricetta, ho incollato un cartoncino Kraft sul retro e con santa pazienza ho ritagliato di nuovo tutto il contorno. Le righe e la scritta Notes sono timbri Papertrey Ink, la pera, la mela e le posate sono Magnolia.

I decided to use also the back of the recipes; I didn't like the mark left by Copic and I like the idea to create a space for notes for every recipe.
So, after I finished the front of the recipe, I stick a Kraft cardstock on the back and with holy patience I cut all around again. The lines and the sentiment Notes are Papertrey Ink stamps, the pear, the apple and the cutlery are Magnolia.

 Questo è il retro del box e il retro della Tilda. Per la scatolina ho usato la calamita in rotolo, moltoooo comoda.

This is the back of the box and the back of the Tilda. For the box I used the magnet in roll, sooooooo confortable.
Questa è la visione d'insieme del fronte delle ricette.

This is the entire vision of the front of the recipes.
 E questa è la visione d'insieme del retro delle ricette.

And this is the entire vision of the back of the recipes.

Grazie per essere arrivati alla fine di questo lunghissimo post.
Spero che il mio lavoro vi sia piaciuto e che vi abbia dato qualche idea.
Buon fine settimana a tutti!!!!!!!!!

Thank you to arrive at the end of this long long post.
I hope my work liked you and gave you same ideas.
Happy weekend to you all!!!!!!!!!

Thanks for stopping by

Giò
giovedì 16 dicembre 2010

Stampavie & More challenge

Ecco il lavoro preparato per il challenge della Stampavie & More.
Il tema di questa settimana è: FACCIAMO UN REGALINO!!

Here is a work I made for Stampavie & More challenge.
This week's theme is: MAKE A GIFT!!


Ho fatto una scatolina con le ali.... come ha detto mio nipotino!!!! e una piccola card abbinata.
Tutto il materiale per realizzare questo lavoro lo potete trovare da TIMBROSCRAPMANIA

I made a Wings Box..... as my nephew says!!!! and a little card.
You can find all materials for this work on TIMBROSCRAPMANIA


Ora vi auguro buona giornata e corro a prepararmi per uscire, ho ancora un sacco di regalini a cui pensare.........
come mi diverto amiche mie!!!!!!!!

Now  I wish you a wonderful day and go,  I still have a lot of little Christmas gifts to think about.............
I enjoy it so much my friends
Thanks for stopping by
Giò


Materials
Papers: Maja Design
Stamps: Magnolia Lazy Summer Tilda, Papertrey Ink sentiment;
Mediums: Memento Tuxedo Black; Copics; Stickles Crystal Ice;
Tools: Big Shot, Magnolia Doohickeys Tilda Lace, Magnolia Doohickeys Angel Wing, Nestabilities circles.

mercoledì 18 agosto 2010

SPECIAL BIRTHDAY CARD

La mia piccola Alice ha compiuto 16 anni!!!!!!
Non so dirvi se mi sono rassegnata all'idea di vederla crescere....... ogni tanto la guardo e guardo l'altra mia bimba (Eleonora 18 anni) e mi prende fortissima la nostalgia di quando erano due piccoli angioletti.
Poi vedo quanto sono belle dentro e fuori e allora mi sembra bellissimo che stiano crescendo così in fretta....... ve l'ho detto, sono un po confusa LOL
Comunque, questa è la card che ho preparato per questa occasione speciale.

My little Alice is now 16!!!!!
I can't tell you if I got used to the idea to see her growing up..... sometimes I watch her and I watch my other baby (Eleonora 18 anni) and a really strong nostalgia catches me thinking about when they were two little angels. But then I see how much beautiful they are inside and outside and so I think it's fantastic they are growing up so fast........ I already told to you, I am a bit confused LOL
Anyway, this is the card I made for this special occasion.


I timbri sono C.C. Design e sono colorati con i Copic.
A breve troverete questi deliziosi timbri sullo shop online TIMBROSCRAPMANIA.
La base è un cartoncino Kraft embossato con una embossing folder (Cuttelbug) sporcata con un ink rosa.
Con la penna gel bianca ho ripreso alcuni punti sullo sfondo e ho fatto una finta cucitura tutto intorno.

The stamps are C.C. Design and I colored it with Copic.
Short you will find these cute stamps on TIMBROSCRAPMANIA shop online.
My base is a Kraft cardstock embossed with an embossing folder (Cuttelbug), I dirty it with a pink ink.
With a gel white pen I took again some points on the background and I made a false stitch all around.


La scritta è Hero Arts.
Il pizzo è un bellissimo pizzo Valencienne della mia collezione privata.

The sentiment is Hero Arts.
The lace is a beautiful Valencienne from my personal collection.


Thanks for stopping by

Giò